Learn

Learn Tequila.

From your first render to scripting the whole app. Pick a track and work through it, or look up any feature below to see exactly where it is.


The window

What's where.

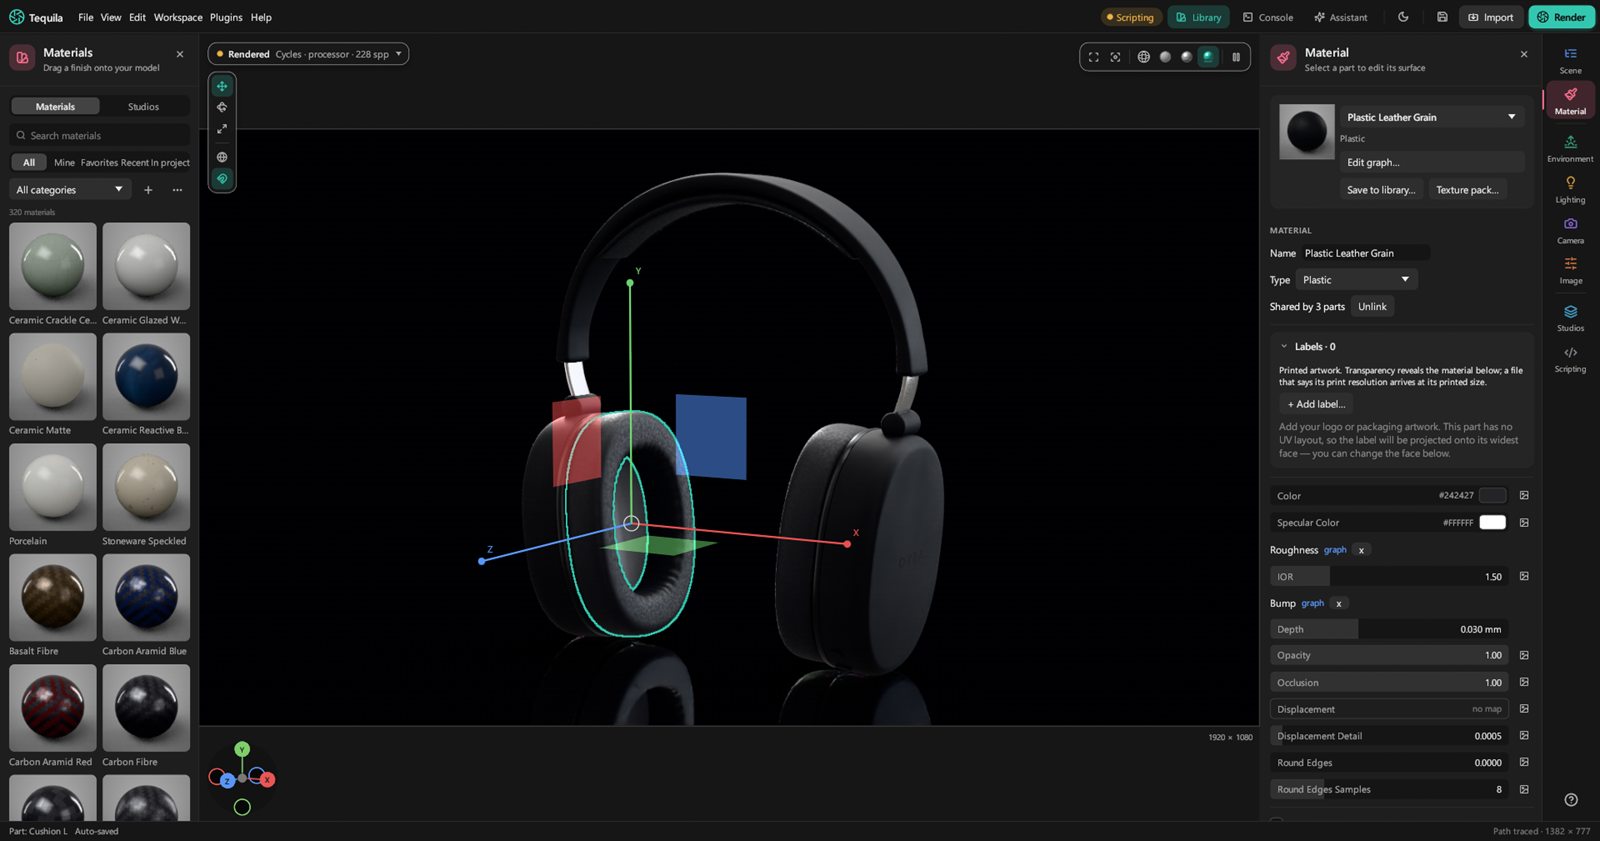
Everything in Tequila lives in one of these places. The numbers match the list underneath.

Tequila's window with the headphones sample: the library on the left, the viewport in the middle, the Material tab and the tab rail on the right 1 2 3 4 5 6 7 8 9 10 11 12
  1. The menus. File, View, Edit, Workspace, Plugins and Help. Workspace sets the panels up for a job: Studio, Materials, Lighting, Camera & composition, Presentation, UV layout, Configurator.
  2. The toolbar. Library, Console and Assistant open their panels. The sun or moon sets the look, then Save, Import and the green Render button.
  3. The material library (M). About 330 materials to drag onto the model, and the studio presets under Studios.
  4. The tool strip. Move, Rotate and Scale (W E R), local or world axes, and snapping.
  5. The view chip. What the viewport is showing. In the Rendered view, click it to pick the renderer.
  6. View buttons. Frame all, frame selection, the four views (Wireframe, Solid, Material Preview, Rendered), and pause.
  7. The viewport. Drag to orbit, middle-drag to pan, scroll to zoom. Right-click for a menu.
  8. The axis legend. Click an axis to look along it; the centre dot is the isometric view.
  9. The render frame. The viewport is shown at the shape of your render, with its size beside it.
  10. The Inspector (Space). The settings for the tab you're on: here, the material of the selected ear cushion.
  11. The tab rail. Scene, Material, Environment, Lighting, Camera, Image, Studios, Scripting. The ? at the bottom lists the shortcuts.
  12. The status bar. What's selected, what just happened, a tip now and then, and the renderer and size on the right.

Three things that catch people out

  • The Lighting tab sets the render's quality and how light travels. The lights themselves are on the Environment tab (and Workspace › Lighting opens that one).
  • Select a scene light or a cutaway and its settings show on the Material tab.
  • A material dropped on several parts is one material: change it and they all change. Unlink on the Material tab gives a part its own copy.

Every feature

Where is it?

Type what you're after. Each row says where to find it, what it does and how far in it sits. The › marks one step: a menu, a tab, a section, a button.

Projects and files

FeatureWhereWhat it doesLevel
Start screenShown when Tequila opens, or Help › Start screenNew project, open, import, your recent projects with pictures, and the samples.Basics
SamplesStart screen › SamplesOpens a finished scene as a new, unsaved project to look around in.Basics
Import a modelFile › Import model… (Ctrl+I), the toolbar's Import, or drop the file on the windowSTEP, IGES, Rhino, glTF, FBX, OBJ, STL, 3MF, PLY, USD and USDZ, IFC, or a KeyShot scene's model.Basics
Open a KeyShot sceneFile › Open project…, or drop the .ksp / .bip on the windowA new project with its model, materials, lighting, cameras and look. Importing one takes only the model.Basics
Save, Save as, New, OpenFile, or Ctrl+S / Ctrl+Shift+S / Ctrl+N / Ctrl+OA .tequila project keeps the whole scene, with a picture for the start screen.Basics
Open recentFile › Open recent, or the start screenThe last ten projects. Clear the list empties it.Basics
Recover unsaved workOffered by itself on the next launchTequila saves your work every five minutes; after a crash, Recover brings it back.Basics
Undo and redoEdit, or Ctrl+Z / Ctrl+YThe menu names the step it takes back. A drag, a script or a whole drop is one step.Basics
UpdatesHelp › Check for updates…Downloads and installs the newest version and keeps your settings. Checks once a day if you let it.Basics
AppearanceThe sun or moon button in the toolbarLight, Dark or Auto; six colour themes; Compact, Regular or Large.Basics
Crash reportsHelp › Crash reportsWhat happened, with Copy for Discord to report it.Intermediate
Test this computerHelp › Test this computer…Renders a small scene with every engine and graphics card it finds, checks it, and gives a short report to paste on Discord. Nothing is sent anywhere.Basics
SpaceMouseEdit › Preferences…Turn, pan and zoom the view with a 3Dconnexion SpaceMouse; its speed and axes are set here.Intermediate
Export glTF or USDFile › Export glTF (.glb)… / Export USD (.usda)…What's shown, with its materials, for other apps and AR viewers.Intermediate
Export for ARFile › Export USDZ for AR (.usdz)…A file an iPhone, iPad or Apple Vision Pro opens in AR, at real size, with the materials baked for AR viewers.Intermediate
Send from Blender, SolidWorks or ZBrushThe add-ons in the repository's integrations folderBlender's Tequila LiveLink panel sends the model and keeps it in sync; edits you made in Tequila stay.Advanced

Viewport and navigation

FeatureWhereWhat it doesLevel
Orbit, pan, zoomLeft drag, middle drag, scrollAlt+scroll changes the focal length; Alt+right drag dollies.Basics
Frame the modelF (selection), Shift+F (everything), or the view buttonsFits it in view without changing the direction you look from.Basics
Standard viewsView › Standard view, Ctrl+Alt+1…7, or click the axis legendFront, Back, Left, Right, Top, Bottom, Isometric.Basics
The four viewsView buttons at the viewport's top right, Z to step, D for Rendered and backWireframe, Solid, Material Preview (a quick guess) and Rendered (the real picture).Basics
Render frameView › Render frame (on to begin with)Shows the shape and size the picture will be.Basics
Hide panelsSpace (Inspector), M (Library), Tab (full viewport)More room for the picture.Basics
Ground gridView › Ground grid, or Camera › Ground gridA guide on the floor, never rendered.Basics
Pause the viewportP, or the pause buttonStops it rendering and keeps the samples so far.Intermediate
Pick the rendererIn the Rendered view, click the view chip at the top leftTequila, Cycles (processor) or Cycles (graphics card), for the view and for renders.Intermediate
Render statisticsH, or View › Render statisticsSamples, time, speed, resolution and triangles, over the viewport.Intermediate
Model edgesView › Model edgesDraws edges over the Solid and Material Preview views.Intermediate

The model and the scene

FeatureWhereWhat it doesLevel
SelectClick a part; Shift+click adds, Ctrl+Shift+click takes away; double-click for its groupCtrl+A selects all, Esc none.Basics
The parts listScene tabEvery part and group, with an eye to hide and a lock. Click a row to select it.Basics
Hide, isolate, show allCtrl+H, /, Alt+H, or right-click a partGet parts out of the way while you work.Basics
Turn a CAD model uprightScene › right-click the model › Turn › Upright (drawn Z up)For STEP and IGES models that arrive lying on their backs.Basics
Split into partsRight-click a part › Split into N partsSeparates a mesh's loose pieces so each can have its own material.Basics
RenameDouble-click a row in the Scene tab, or F2Enter keeps it, Esc cancels.Basics
Group, ungroup, deleteScene › Group (Ctrl+G), Ungroup, DeleteGroups move together and can be dressed in one drop.Basics
Search the partsScene › the search boxFinds by name, or by a field: Material = ABS, AB*. Select all selects what it found.Intermediate
Selection levelScene › Select: Part, Object, Material, FaceWhat a click picks. Ctrl+click picks every part with the same material.Intermediate
Move, rotate, scaleThe tool strip, or W / E / R, with a part selectedDrag the handles. Each drag is one undo step.Intermediate
SnappingThe magnet on the tool stripGrid snap, Angle snap (15°, on to begin with) and Vertex snap.Intermediate
Exact position, pivot, drop to groundScene › TransformType positions with units (2.5in) or sums (=120/2). Hold Insert and click to put the pivot on the model.Intermediate
ReparentDrag a row in the Scene tabOnto a group puts it inside; onto another row puts it beside.Intermediate
UnitsScene › Scene units, or right-click a model › Units of this model…Tells Tequila how big the model really is. Asked by itself for files with no units.Intermediate
MeasureScene › Measurements › Measure, then click two pointsSnaps to corners, midpoints, edges and surfaces; distances are saved with the project.Intermediate
LockThe lock on a row in the Scene tabStops a part being moved, deleted or re-dressed by accident.Intermediate
Improve a modelRight-click a model › Improve model…Smoother CAD curves, subdivision, and smooth shading with an angle for sharp edges.Advanced
Reload or update a modelFile › Reload model from file, or right-click › Update from another file…Brings in a new version and keeps materials, labels and names, matching parts by name.Advanced
MetadataScene › MetadataRead and edit part fields, find parts by value, and Export CSV.Advanced
CAD layersScene › Layers (for files that have them)Show or hide a layer, or select its parts.Advanced
TessellationRight-click a CAD model › TessellationDraft, Medium, High or Ultra: how finely curved surfaces are divided.Advanced
Ray visibility and holdoutScene › Visible toWhether the camera, reflections, bounced light, glass and shadows see a part; Holdout cuts it out.Advanced
CutawaysScene › Add › Cutaway: Plane, Box, Sphere, CylinderCuts the model open; its settings show on the Material tab when selected.Advanced

Materials

FeatureWhereWhat it doesLevel
The material libraryThe toolbar's Library, or MAbout 330 materials, each shown as a rendered ball.Basics
Apply a materialDrag a ball onto a part, or select parts and double-click the ballDropping on a selected part dresses the whole selection; on a group, the whole group.Basics
Find a materialLibrary › Search materials, the shelves and All categoriesShelves: All, Mine, Favorites, Recent, In project.Basics
FavouritesThe star on a library ballKeeps it on the Favorites shelf.Basics
Change colour, roughness, typeMaterial tab, with a part selectedThe type's controls, with a live preview ball at the top.Basics
Shared materials and UnlinkMaterial › Shared by N parts › UnlinkGives one part its own copy, so editing it stops changing the others.Basics
Drop modifiersHold a key while dropping a library ballShift: the whole group. Ctrl: every part with the same material. Alt: this part only, unlinked.Intermediate
Select similarRight-click a part › Select similarEvery part sharing its material.Intermediate
Images on a materialMaterial › the picture button beside a setting › Image…Drives that setting from a picture, with a Mapping fold for how it wraps.Intermediate
PatternsMaterial › the picture button › a pattern17 built-in patterns: Wood, Marble, Brushed, Leather, Weave, Scratches, Perforated mesh and more.Intermediate
Texture packsFile › Import texture pack, or drop a folder or ZIP on the windowA pack's colour, roughness, normal and height maps become one material on the selected parts.Intermediate
Substance materialsMaterial › Substance…, or open an .sbsar or .sbs fileThe material's settings in the Material tab. With Adobe's Substance tools installed, its textures render again as you change them.Advanced
Texture sizeMaterial › Texture size or Texture repeatsHow big a texture's pattern is on the part.Intermediate
Save to your libraryMaterial › Save to library…Keeps a copy of a material you tuned, with its pictures, on the Mine shelf.Intermediate
New library materialThe + in the library, or File › New library material…From a type, the selected part, a texture pack or a file.Intermediate
Import or share a materialFile › Import material file…; right-click a library ball › Export….fsmat packages, material JSON, and KeyShot .kmp files.Intermediate
Colour rampUnder a colour driven by a pattern › Colour rampMaps the pattern onto colours; presets Greyscale, Wood, Marble and Rust.Intermediate
ColourwaysStudios › Material variantsSeveral materials for the same parts, one in use, switched in a click.Intermediate
Every parameterMaterial › Show every parameterShows all of a material's settings, not only the ones its type needs.Advanced
Node graphMaterial › Edit graph…Builds a material from nodes in a window of its own.Advanced
Material templatesMaterial › Material templatesRules (part name, material name, colour, metadata) that dress a whole assembly at once.Advanced
VolumesMaterial › the picture button beside Density › OpenVDB volume…Smoke and clouds from a .vdb file, in a Scattering Medium.Advanced

Labels and UV layouts

FeatureWhereWhat it doesLevel
Add a labelMaterial › Labels › + Add label…A logo or artwork printed on the part. A video file lets you pick a frame.Basics
Place a labelThe label's + Place, then click the partDrag to slide it; Ctrl+scroll sizes it, Shift+scroll turns it, Esc finishes.Intermediate
Label placement and finishThe label's Placement & finishOn UV map, Project flat or Wrap around; size, turn, mirror; opacity, roughness, Ink and Foil.Intermediate
UV editorView › UV editor, Workspace › UV layout, or a label's UV editorUnwrap, cut, stitch, pack and straighten a part's layout, and place labels on it.Advanced
Export a UV layoutUV editor › Export layoutA PNG or SVG of the layout to design artwork over.Advanced

Light and the environment

FeatureWhereWhat it doesLevel
Load an HDRIEnvironment › HDRI › Load…Lights the scene with a photographed environment (.hdr or .exr). Use built-in goes back.Basics
Turn and brighten the lightEnvironment › Transform › Rotation, and BrightnessMoves the highlights round the product.Basics
BackgroundEnvironment › Background: Environment, Color, BackplateWhat shows behind the product. With nothing selected, E, C and B switch it.Basics
Studio presetsLibrary › StudiosA whole setup of light, camera and look in one click, sized to your product.Basics
Floor shadows and reflectionsEnvironment › GroundCatch shadows, ground reflections and how they fade, floor bounce, and the floor's size.Intermediate
Lighting pinsEnvironment › Lighting pins › + SoftboxSoftboxes painted into the environment; drag them on the map above, or set Around, Height, Size and Softness.Intermediate
Put a highlight where you clickA pin's ◎ Aim, then click the modelThe pin moves so its highlight lands there.Intermediate
Ready-made pin setupsLighting pins › Three-point, Overhead softbox, Two stripsReplaces your pins with a classic setup.Intermediate
BackdropLighting pins › + BackdropA gradient behind the product that doesn't change the light.Intermediate
Sun and skyEnvironment › Sun & sky › Light the scene with a skyMidday, Afternoon, Golden hour or Overcast, with the sun's direction and haze.Intermediate
Lights in the sceneScene › Add › Light: Area, Disc, Point, Spot, SunReal lights you place with the gizmo. Select one to see its settings on the Material tab.Intermediate
Export the environmentLighting pins › Export HDRI…Writes the environment with your pins in it, up to 8K, for other apps.Advanced
Light linkingSelect a scene light › Light linking / Shadow linkingWhich parts a light lights, and which cast its shadows.Advanced
Photometric lightsSelect a scene light › Photometric fileA real fixture's light from its .ies file.Advanced
Quality presetsLighting tab: Performance, Basic, Product, Interior, JewelryHow light travels; Product is the default, Jewelry traces caustics for gems.Advanced
Bounces and causticsLighting › TransportRay and transmission bounces, global illumination, and caustics by Photons or Manifold.Advanced

Camera and image

FeatureWhereWhat it doesLevel
Focal lengthCamera › Focal length, or Alt+scrollLong lenses flatten the product; short ones exaggerate it.Basics
Save a viewCamera › Save current view as a cameraKeeps the view; click it in the list to go back to it.Basics
ExposureImage › ExposureBrighter or darker, without starting the render again.Basics
Depth of fieldCamera › Depth of fieldf-number, focus distance, Keep focus, and a round or bladed aperture.Intermediate
Lens typeCamera › LensPerspective, Orthographic, Shift (straight verticals) or Spherical (360°).Intermediate
Photographic gradingImage › PhotographicHighlights, shadows, whites, blacks, temperature, tint, vignette, bloom, sharpening.Intermediate
Tone mapImage › Tone mapAgX, ACES, PBR Neutral (the default), sRGB or Raw.Intermediate
DenoisingImage › Denoise, or the Render window's DenoiseCleans the noise out of the picture as it renders.Intermediate
Camera exposureCamera › Use camera exposureISO and shutter speed, as on a real camera.Advanced
Match a photo's perspectiveCamera › Match perspectiveLines the camera up with a backplate from points you set.Advanced
Colour managementImage › Colour managementAn OCIO config, with its display and view.Advanced

Rendering and output

FeatureWhereWhat it doesLevel
Render a pictureThe green Render button, or Ctrl+R, then RenderRenders in the background while you keep working; renders queue up.Basics
Picture sizeRender window › Image sizeHD 1080p, 4K UHD, Square, Portrait 4:5, Story 9:16, Web banner, A4 at 300 DPI, or your own.Basics
QualityRender window › Quality: Draft, Good, High, FinalSamples per pixel: 32, 256, 1024 or 4096. Stop after sets a time limit.Basics
Where it savesRender window › FileFolder, file name, format. A render never overwrites a file: it adds _2.Basics
Compare rendersRender window › right-click a finished render › Compare with the one on screenA wipe between two versions.Intermediate
Transparent backgroundRender window › File › AlphaStraight or premultiplied alpha, or Silhouette: the product cut out with solid glass.Intermediate
File typesRender window › File › FormatPNG, JPEG, TIFF, EXR, PSD; 8, 16 or 32 bits.Intermediate
File name tokensRender window › File name › the + project, + camera… buttonsNames files after the project, camera, view, date, size or samples.Intermediate
Wireframe rendersRender window › Render wireframeA line drawing in a second or two, dark or on paper.Intermediate
The queueRender window › the filmstrip, right-click a cardHold, resume, move earlier or later, remove.Intermediate
Saved shots (Studios)Studios › + Studio from the current shotCamera, environment, image and more, recalled in a click. Render all N views renders each.Intermediate
Reorder StudiosStudios › drag a Studio up or downEach Studio shows its picture, saved with the project.Intermediate
Save a studio presetLibrary › Studios › Save current studio…Your lighting setup, to use on any product.Intermediate
TurntableStudios › Turntable › Make turntableFrames all the way round, rendered as numbered pictures.Intermediate
Spin viewerFile › Export spin viewer…Renders round the product, like a turntable, and builds a web page to turn it by dragging.Intermediate
ConfiguratorStudios › Configurator › Build a configuratorOptions, rules and a picker, from colourways, model sets or Studios.Advanced
PresentWorkspace › Present (F5)Full screen, rendered, with the configurator over it. Esc leaves.Advanced
Export for the webFile › Export for the web…A folder with a page that opens in any browser: live 3D, photos of every combination, or both.Advanced
Render every combinationConfigurator › Try it › Render all N…Queues one render per valid combination.Advanced
Render passesRender window › File › Render passes (EXR or PSD)Diffuse, reflection, depth, normals, masks and more, as layers for compositing.Advanced
Render layersRender window › Render layers › + Layer from selectionParts rendered on their own, as extra pictures.Advanced
Relight after renderingRender layers › Keep light groups for relighting, then RelightChange each light's strength and tint in the finished picture.Advanced
Render a regionRender window › Render part of the image onlyRe-renders just one area.Advanced
Network renderingRender window › Network rendering, with tequila-cli --worker on the other computersSpreads shots across machines that share a token.Advanced

AI, scripts and plugins

FeatureWhereWhat it doesLevel
AssistantThe toolbar's AssistantAsk in your own words: materials, textures, lighting, camera. Undo request takes it all back.Intermediate
Connect an AI appAssistant › Connect an AI… (or Providers…)Claude, Cursor, VS Code, Codex, Gemini CLI, Windsurf, LM Studio or any MCP app, one click each.Intermediate
PluginsPlugins › Manage plugins…Install from a ZIP, turn plugins on, or start one from the template.Intermediate
ConsoleThe toolbar's Console, or `Type commands; help lists them. Run script… runs a file as one undo step.Advanced
Scripting tabScripting tabThe scripting channel's address, a log of what scripts did, and instructions to copy for an AI.Advanced
PythonThe tequila moduletequila.open() runs Tequila without a window; tequila.connect() drives the one you have open.Advanced
Command linetequila-cliRenders and exports without a window, for batches and build servers.Advanced

Nothing matches that. Try another word, or ask on the Discord.


Shortcuts

Keys and the mouse.

Help › Navigation and shortcuts shows these in the app too. On a Mac, use Cmd where it says Ctrl. Keys don't act while you're typing in a field.

Moving around

Left dragOrbit
Middle dragPan
ScrollZoom
Alt + scrollFocal length
Alt + right dragDolly
F / Shift + FFrame the selection / everything
Ctrl + Alt + 1…7Front, Back, Left, Right, Top, Bottom, Isometric
ZStep through the four views
DRendered, and back
PPause the viewport
HRender statistics

Selecting and editing

Click / Shift + clickSelect / add to the selection
Ctrl + Shift + clickTake out of the selection
Ctrl + clickEvery part with that material
Double-clickThe part's group; again for the next one up
Ctrl + A / EscSelect all / none
W E RMove, rotate, scale
Insert + clickPut the pivot on the model
Ctrl + GGroup
Ctrl + HHide the selection
/Isolate it
Alt + HShow everything again
DeleteDelete
Ctrl + Z / Ctrl + YUndo / redo

Panels

SpaceInspector
MMaterial library
UStudios tab
`Console
TabFull viewport
F5Present (Esc leaves)
E / C / B, nothing selectedBackground: environment, colour, backplate

Files

Ctrl + NNew project
Ctrl + OOpen project
Ctrl + IImport model
Ctrl + S / Ctrl + Shift + SSave / save as
Ctrl + RRender window
F2, in the Scene tabRename

The material graph and the UV editor have keys of their own. Each one lists them in its window: in the graph, select nothing to see them; in the UV editor, press ?.

Stuck on something?

Ask on the Discord: someone has probably rendered it before. The Docs have the longer guides, for scripting, plugins and making materials.